
How do you connect Webflow, VSCode, and Github for a better custom code workflow? That’s exactly what we are going to explore in today’s post.
Integrating Visual Studio Code (VSCode) into your Webflow projects can make a significant difference in how you code and test custom code for your Webflow website.
Specifically, VSCode allows us to test JavaScript functionality without the need to publish our Webflow project every time we make a change to the code.
This makes coding your Webflow project smoother and more efficient.
Why use VSCode alongside Webflow?
VSCode is not just another code editor; it's a robust tool that offers a suite of features designed to improve the efficiency and quality of your development work. VSCode offers features Webflow’s code editor doesn’t.
- Syntax highlighting
- Intelligent autocompletion, which helps to reduce errors and speed up the coding process.
- Extensive library of extensions, like Prettier, that will help format your code and GitHub Copilot that brings AI to programming to help speed up the coding process, just to name a few of the many useful extensions VSCode offers.
- Integrated Terminal to install and use packages.
The list can go on and on for why VSCode is useful. But the biggest feature for those pairing VSCode with Webflow is the ability to write and test code without having to publish your project every time you make a change to the code.
But how?
Part 1 - How do you pair VSCode with Webflow?
Here is a step by step guide on how to pair VSCode with Webflow, so you can start effortlessly testing your custom code in your Webflow project today.
It is not as difficult as you might think.
Let’s get started.
First, Install and Launch VSCode
If you don’t have VSCode on your machine, you can install it by downloading VSCode.
Once VSCode is installed and launched, we need to get the project setup.
Second, Create a new folder
Name it something like “Custom Code Webflow Project”. This folder will be our primary workspace for our code.

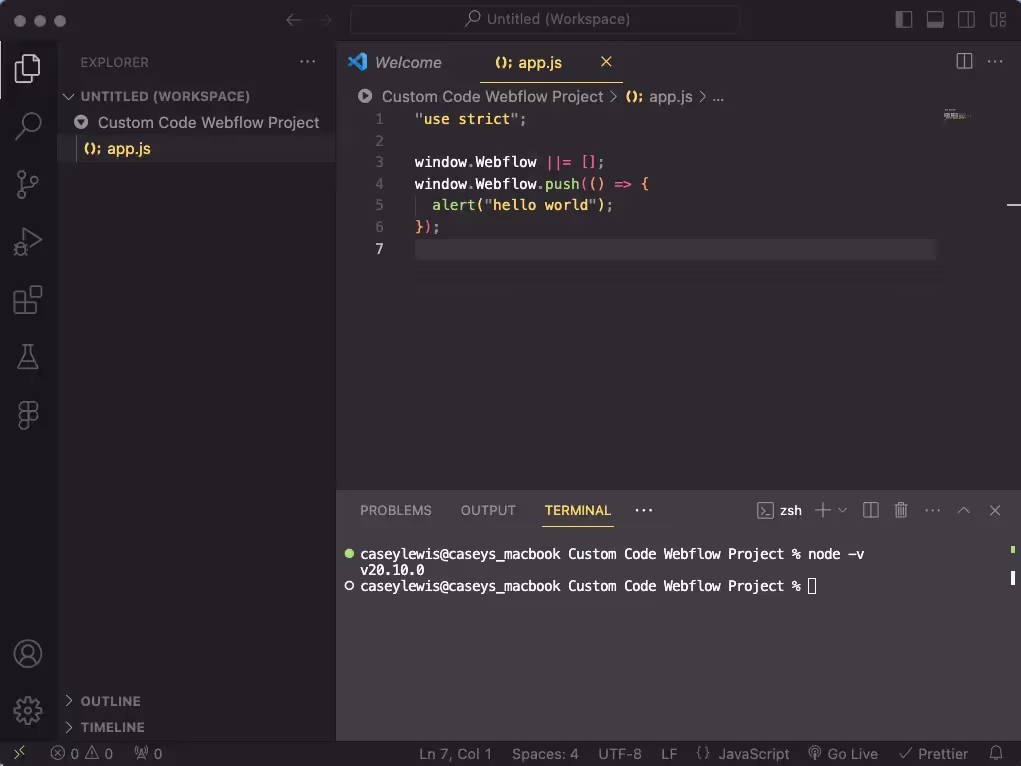
Third, Create a New JavaScript File
Now its time to start setting up the needed files for our project.
Inside the folder you just created, you’ll want to create a JavaScript file.
I named mine 'app.js'.

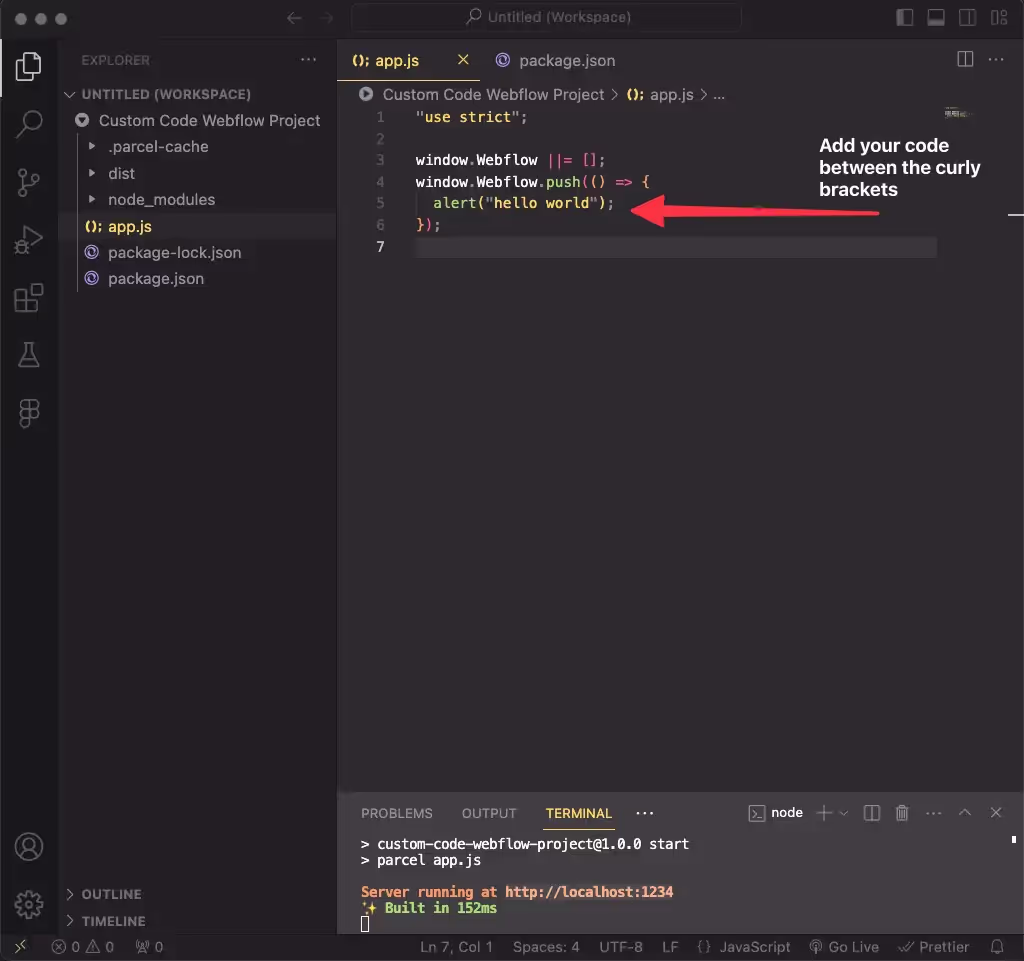
Fourth, Add the following code to your new JavaScript file
"use strict";

window.Webflow ||= [];window.Webflow.push(() => {
	alert("hello world");
});
This code will do two things:
(1) It will insure you are using strict mode in JavaScript.
Without going into too much detail, strict mode in JavaScript helps enforce better coding practices, reduces common errors, and prepares code for future ECMAScript versions, leading to more robust and maintainable scripts.
(2) It will insure your JavaScript is loaded at the right time.
In case you are curious, here is a more detailed explanation:
Webflow sites often load JavaScript in a specific way, and directly adding scripts might not always work as intended due to the timing of when elements are loaded and scripts are executed.
By pushing your function into the window.Webflow array, you ensure that your custom code runs at the appropriate time in the Webflow site's lifecycle, typically after the site's HTML, CSS, and JavaScript have been fully loaded and initialized.
Fifth, Check for Node and NPM Dependencies
Let’s check to see if you have Node and NPM setup on your machine so we can get Parcel installed, which optimizes our files and serves them on a local server for later integration into Webflow.
Open the terminal in VSCode
Terminal —> New Terminal
Verify Node.JS is installed
With the new terminal open, let’s check if Node is installed on your system
Verify if Node.JS is installed with the following command:
node -vIf node is installed, a version will be returned.
If it's not installed, download Node JS from https://nodejs.org/en/.
Follow the instructions to install Node JS
Verify NPM is installed
Let’s check to see if NPM is installed on your machine with the following command.
npm -vAgain, if it is installed, a version will be returned.
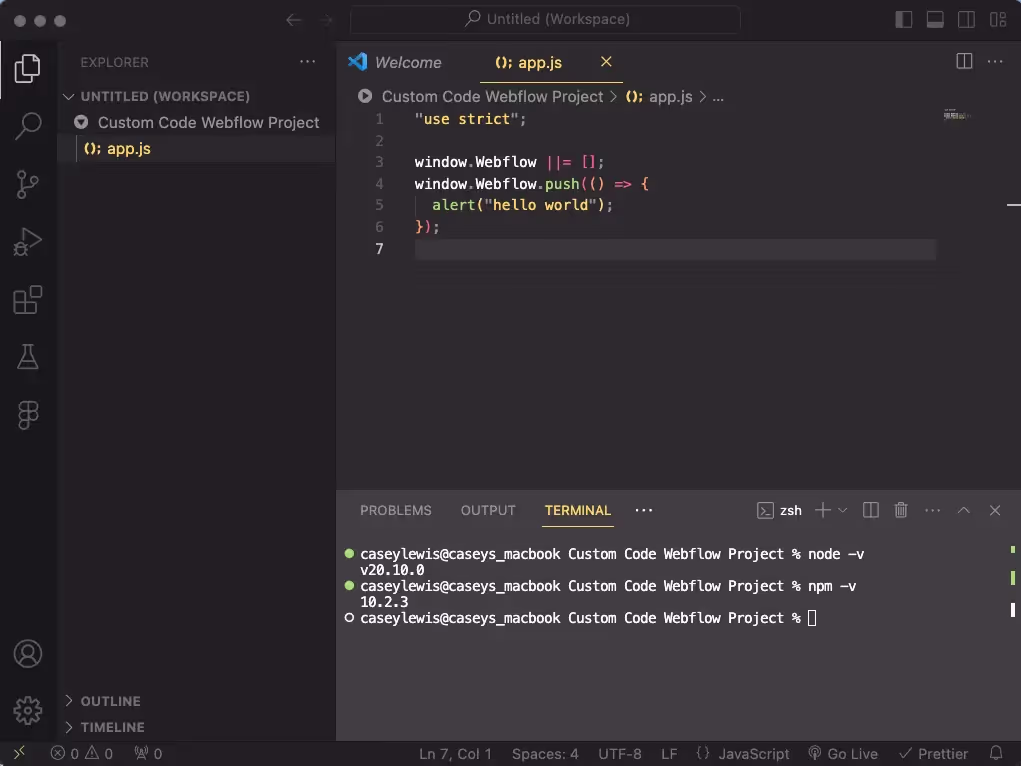
If not, follow the installation guide at https://www.npmjs.com/get-npm to install NPM on your machine.
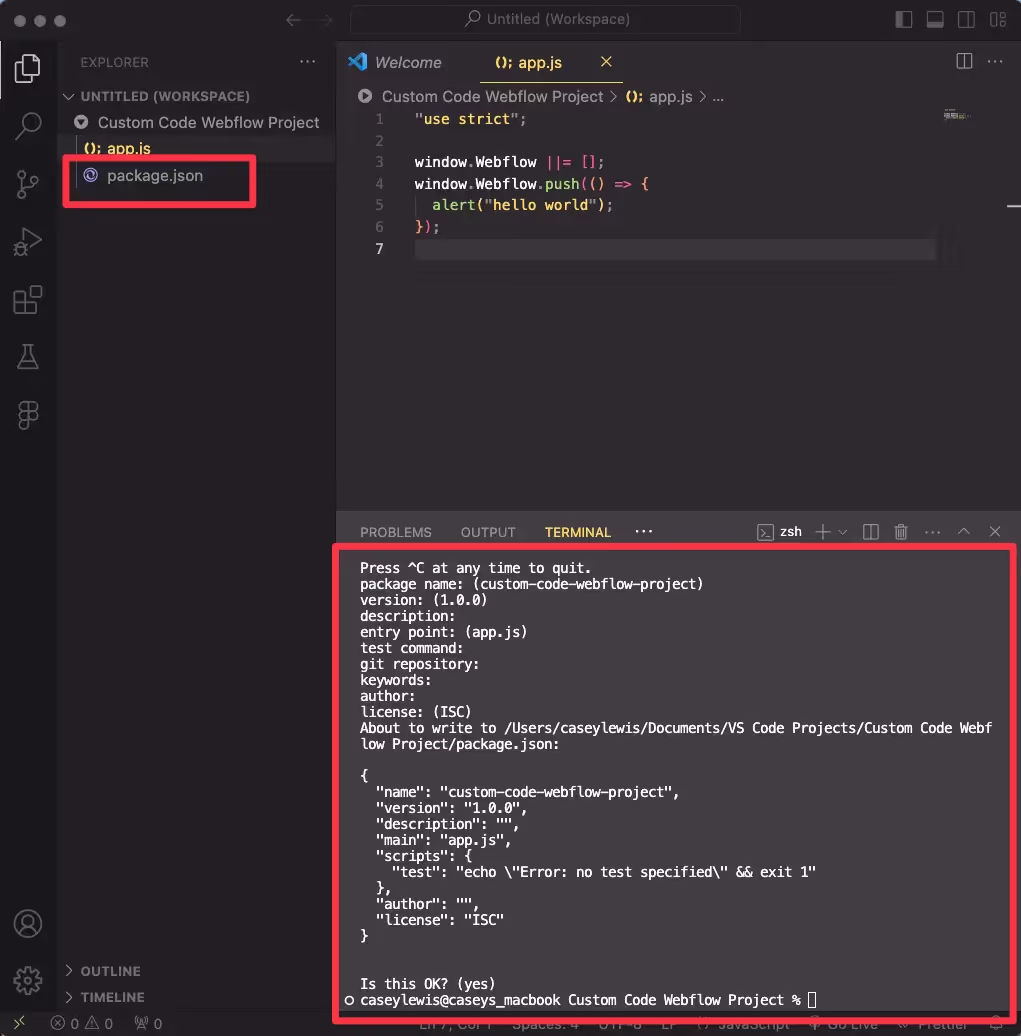
Sixth, Initialize NPM
Now, initialize NPM in your project.
This is a necessary step as initializing NPM (Node Package Manager) in a project involves creating a package.json file in the project's root directory. This file is fundamental in managing project dependencies, scripts, and metadata.
Run the following command:
npm init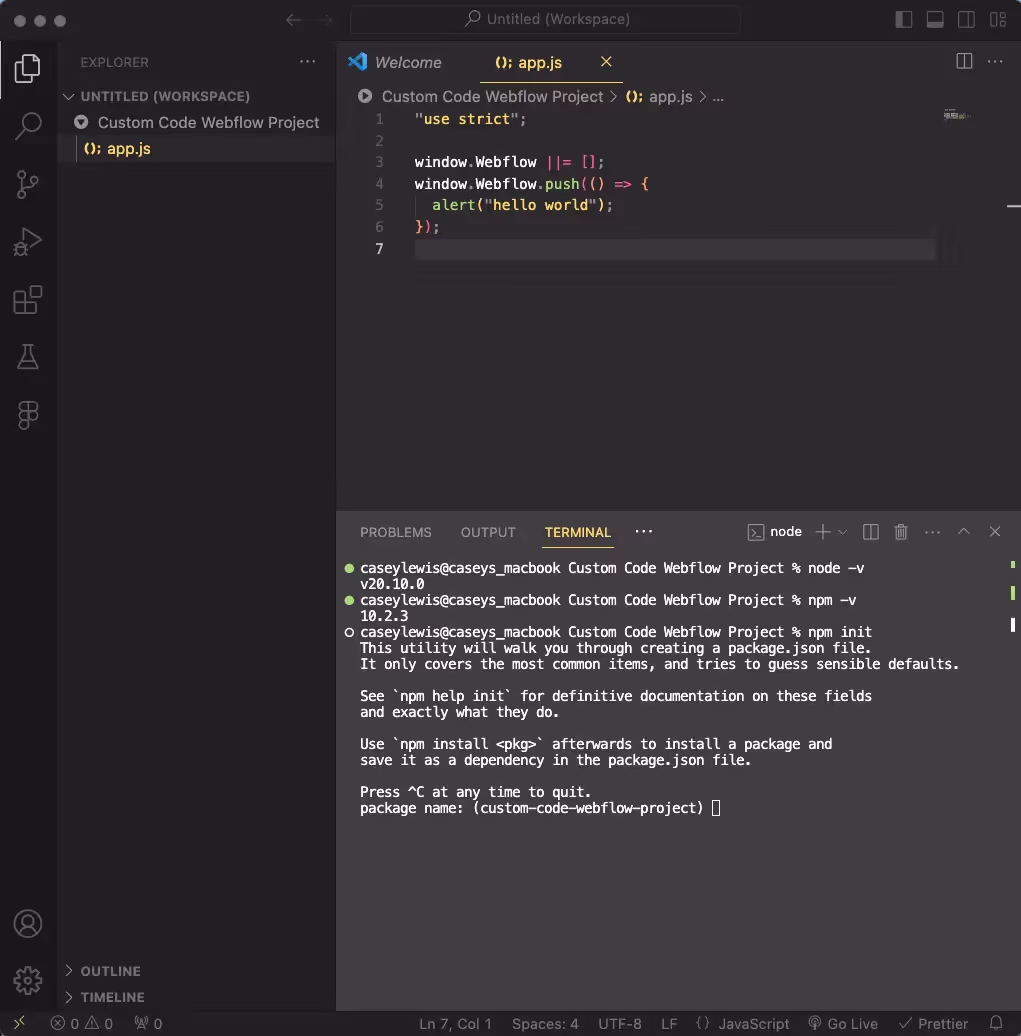
Answer the prompts.
- You answer the prompts either by typing in the necessary information and hitting enter. Or just hitting enter.
- For this simple use case, you will simple hit enter without entering in any information.
The only thing you need to make sure of is that 'app.js' is set as the entry point, which should be set automatically.
When you finish, you must hit enter to answer the question at the end.
After you hit enter, a package.json file will be created in your folder and the terminal will look like the example below.
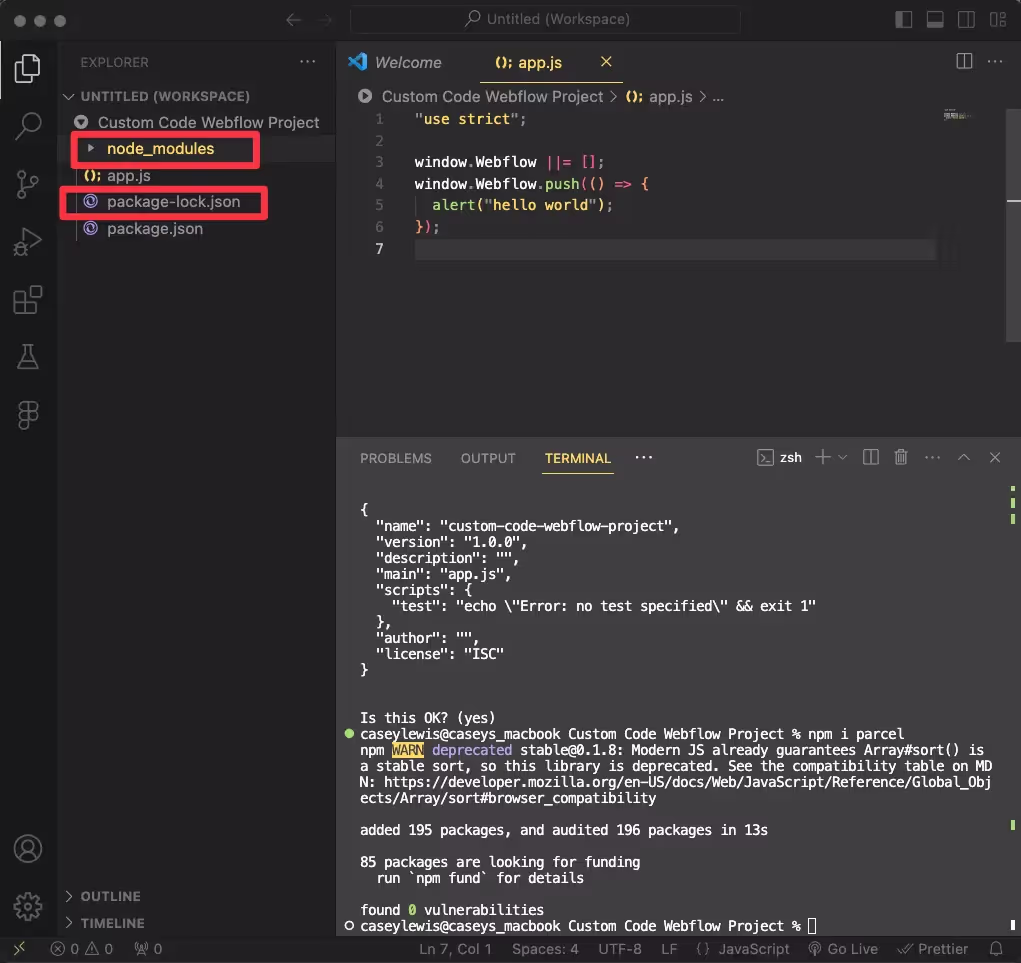
Seventh, Install Parcel Package
Next we need to install Parcel.
What does Parcel do?
While the primary function of Parcel is as a bundler, it does facilitate hosting our code locally for development purposes. This provides a convenient and efficient environment for developing and testing our web applications in Webflow.
Run the command to install Parcel
Install Parcel with the following command
npm i parcel(Refer to https://www.npmjs.com/package/parcel for details)
Once you run the command, a number of packages will be added.
You will have one folder and a new file added.
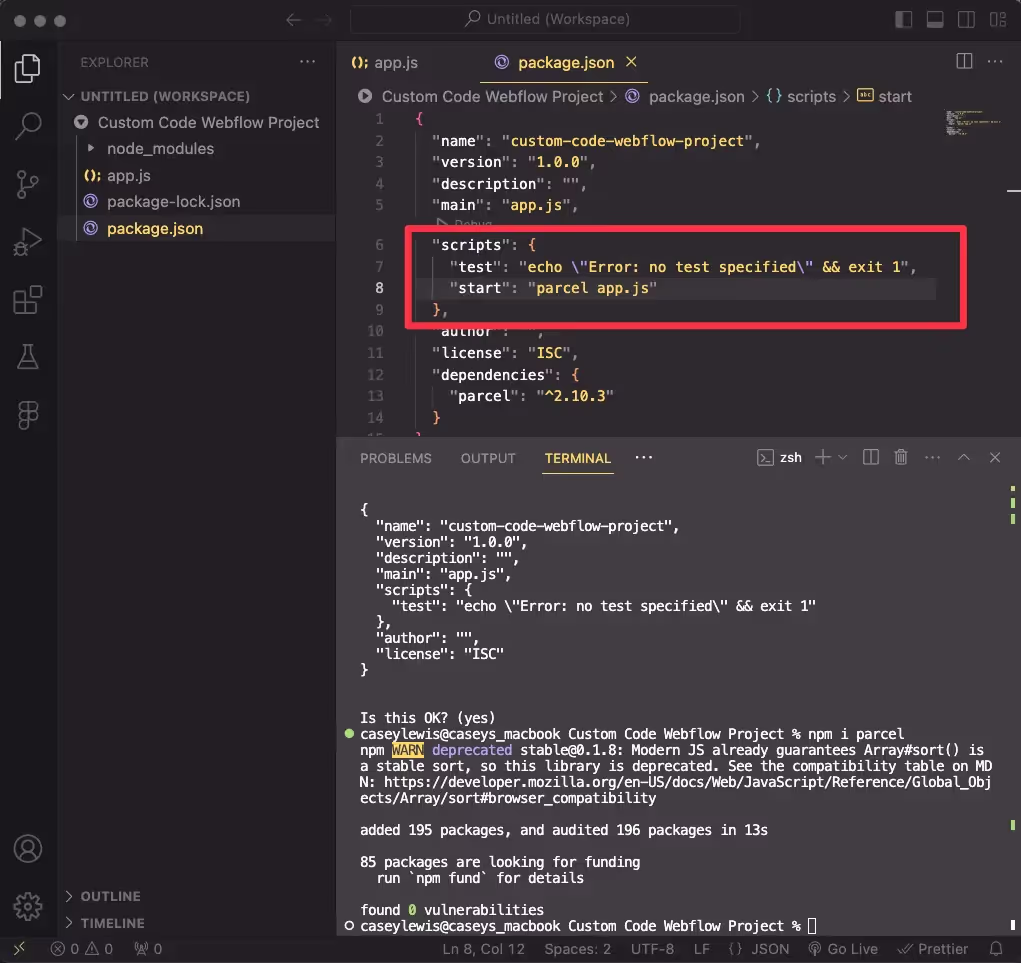
Eighth, Update the Package.Json file with a Start Command
Open your package.json file and in the scripts area, you need to add the following start command:
scripts": {
	"test": "echo \"Error: no test specified\" && exit 1",
    "start": "parcel app.js"
    },
This command will allow us to start parcel and spin up a local development server which we will add to Webflow in the next step.
A Note about the start command
When adding the start command, make sure to add a “,” after the text command. Also, make sure to wrap both start and the command in quotes. Before running "npm start", install Parcel JS:
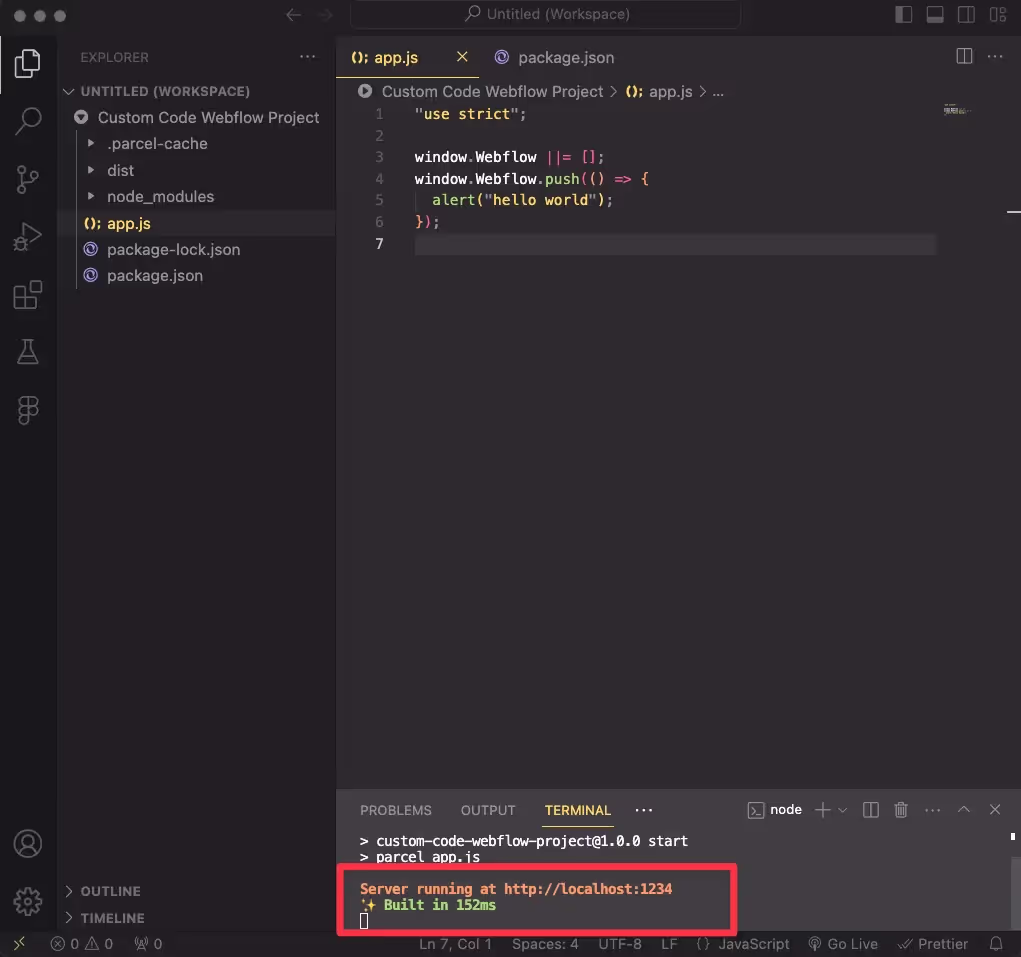
Ninth, Execute the Start Command
We are finally at the step where we are going to execute the start command, spin up a local development server, and connect our Webflow Project to VSCode
Execute the following command in the terminal:
npm startOnce the command is executed, a local server will start running.
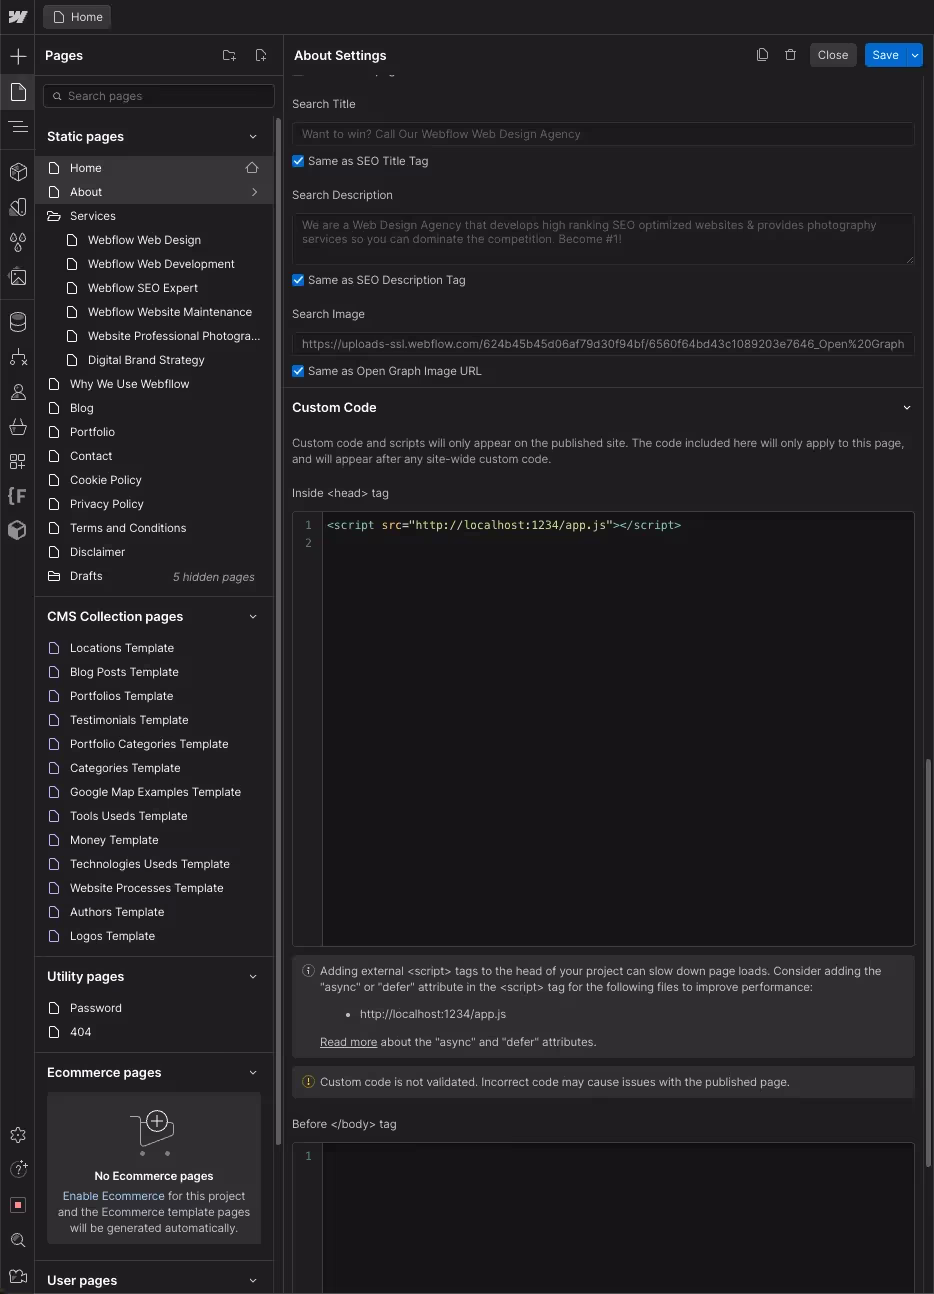
Tenth, Add the Local Server to Your Webflow Project
We are almost there!
The last step is to add the local server to your Webflow project.
Add the code
Copy the code below and paste it into the head section of the page you want to execute the code on. Or you can paste it into the head section for your entire site through the settings area of your project.
<script src="http://localhost:1234/app.js"></script> Items to note:
- Your server will most likely be hosted at 1234, but double check in your terminal.
- Wrap everything in a Script tag
- Add src
- Add app.js to the end or whatever you named your JavaScript file.
Publish your site and visit the page
Publish your site.
Visit the page to which you added the code.
When you visit the page, you should see an alert immediately upon load. If you see the alert you have added everything correctly.
Don’t worry, anyone who comes to your site will not see the alert. It is only occurring locally since you are serving the JavaScript through a local server.

What’s Next?
At this point, you can delete the alert from your code, if you would like.
When writing your code, make sure to add it in the same code block where the alert is added.
Part 2 - Backup Your Webflow Custom Code Project with Github
You don’t have to backup your project to Github, but it is a good idea, especially if you are writing more than a few lines and will be working with the code over the span of the project.
How do you add your project to Github?
Step 1: Create a Github account
If you don’t already have a Github account, then you need will need to create one.
Head over to Github.com and create an account.
Step 2: Download Github Desktop
Github desktop is by far one of the easier ways to work with Github. It simplifies the process into a GUI instead of having to memorize and work with the command line in the Terminal.
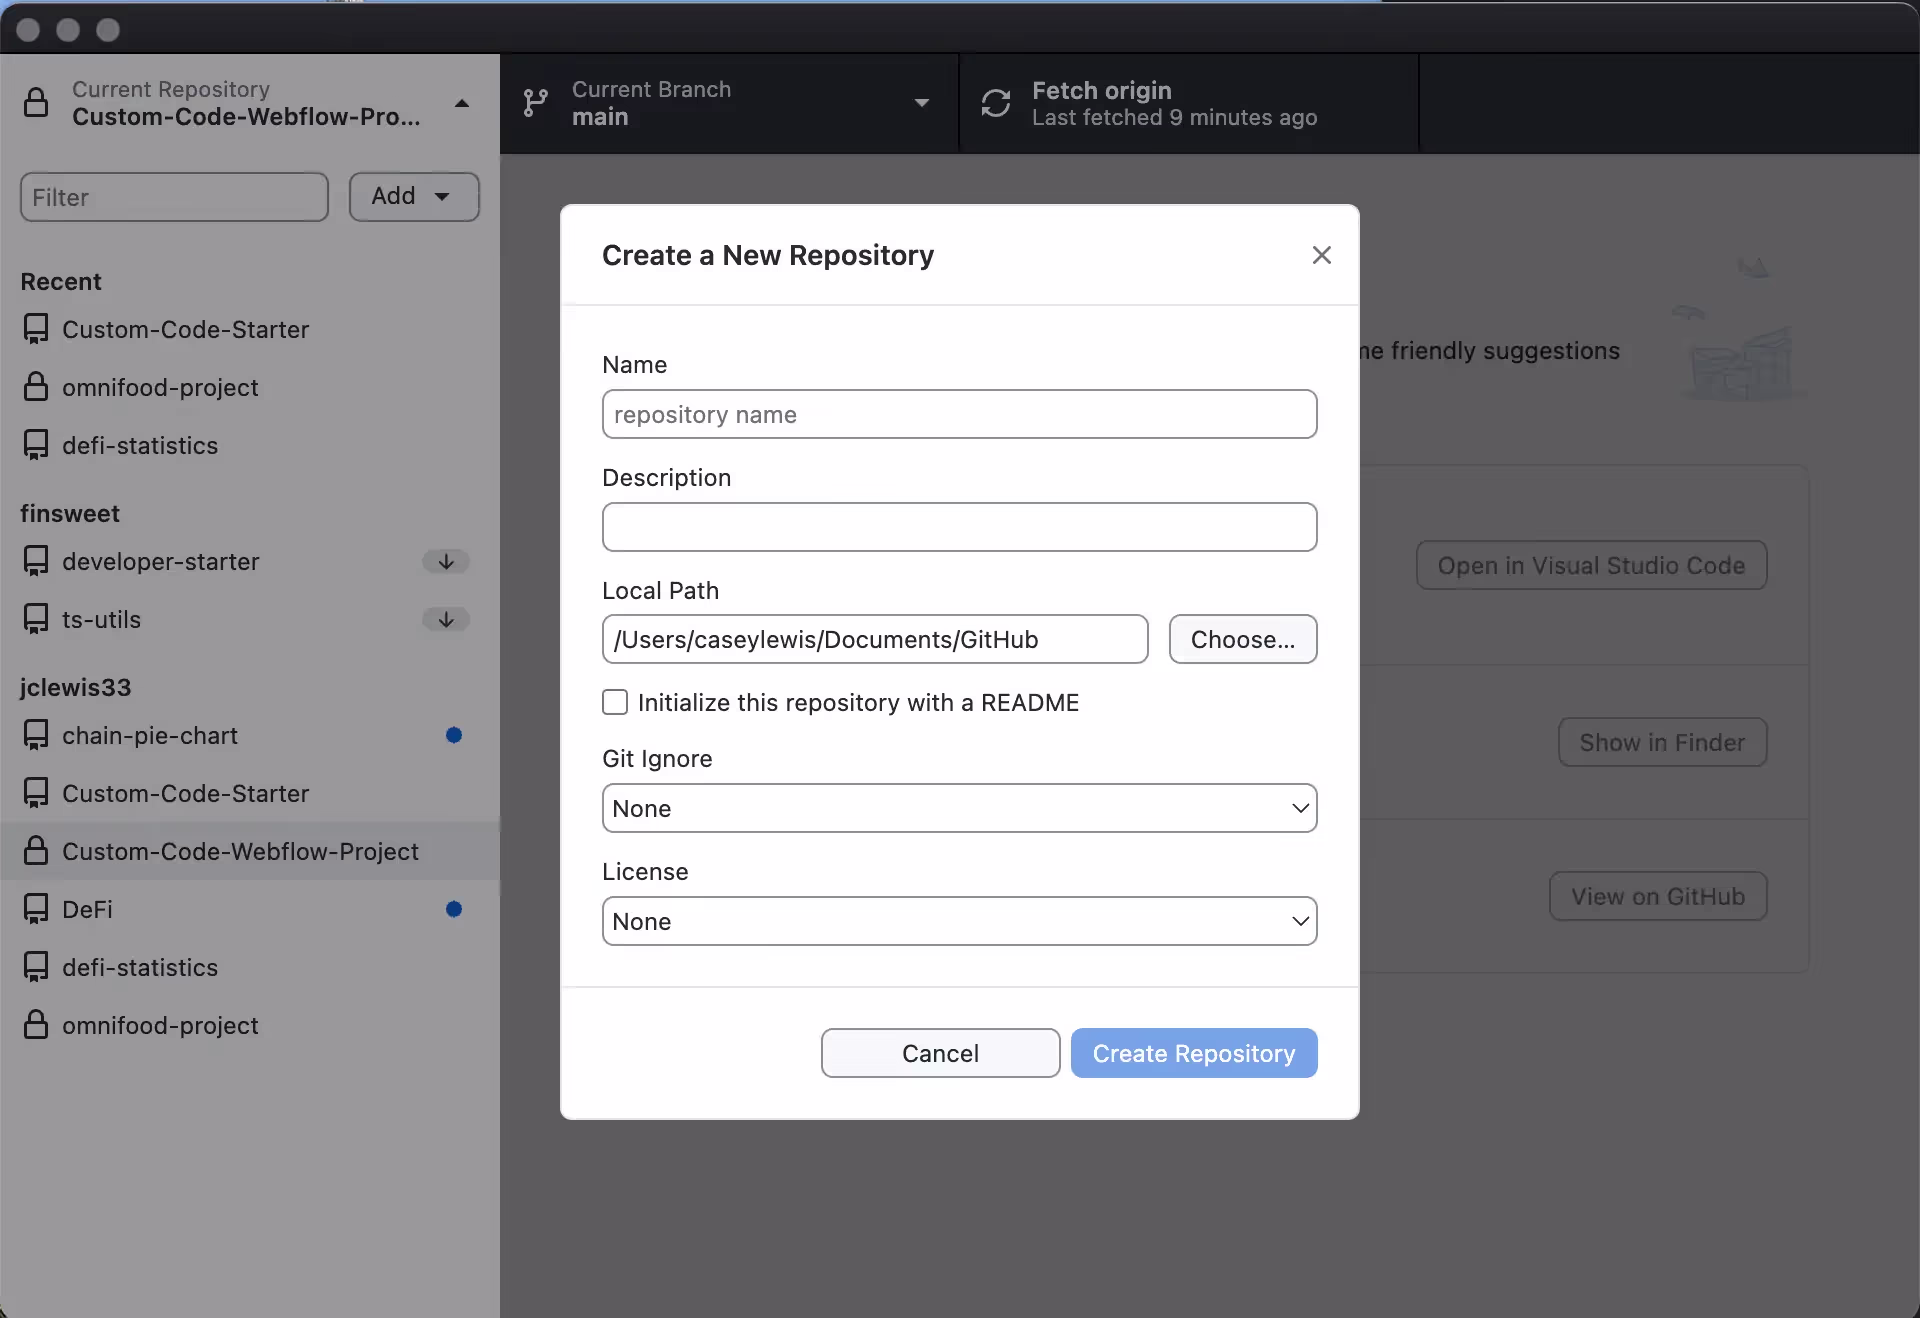
Step 3: Create a New Repository
Click add —> Create New Repository

Name it whatever you would like.
Then click create repository.
Don’t worry about the license or the Git Ignore section. We will add a Git Ignore file in Step 5
Step 4: Add your files to the new repository
Here is what you need to do:
- Click show in finder to view the repository you just created. The folder will be empty. We need to add the files we created in Part 1 to the repository.
- Open the folder from Part 1 in your Finder.
- Copy the files from this folder into your new repository folder.
- VSCode will inform you that your files are no longer available.
- Close the VSCode window.
- Open up the folder to which you copied the files in VSCode.
NOTE: In this instance, we are creating a repository and adding our files to GitHub after the fact. You can combine these steps at the beginning of the process when setting up your project.
Simple start with GitHub desktop and create a repository. Add the files we created in Part 1 to that repository, along with the Git Ignore file we are going to add in the next step.
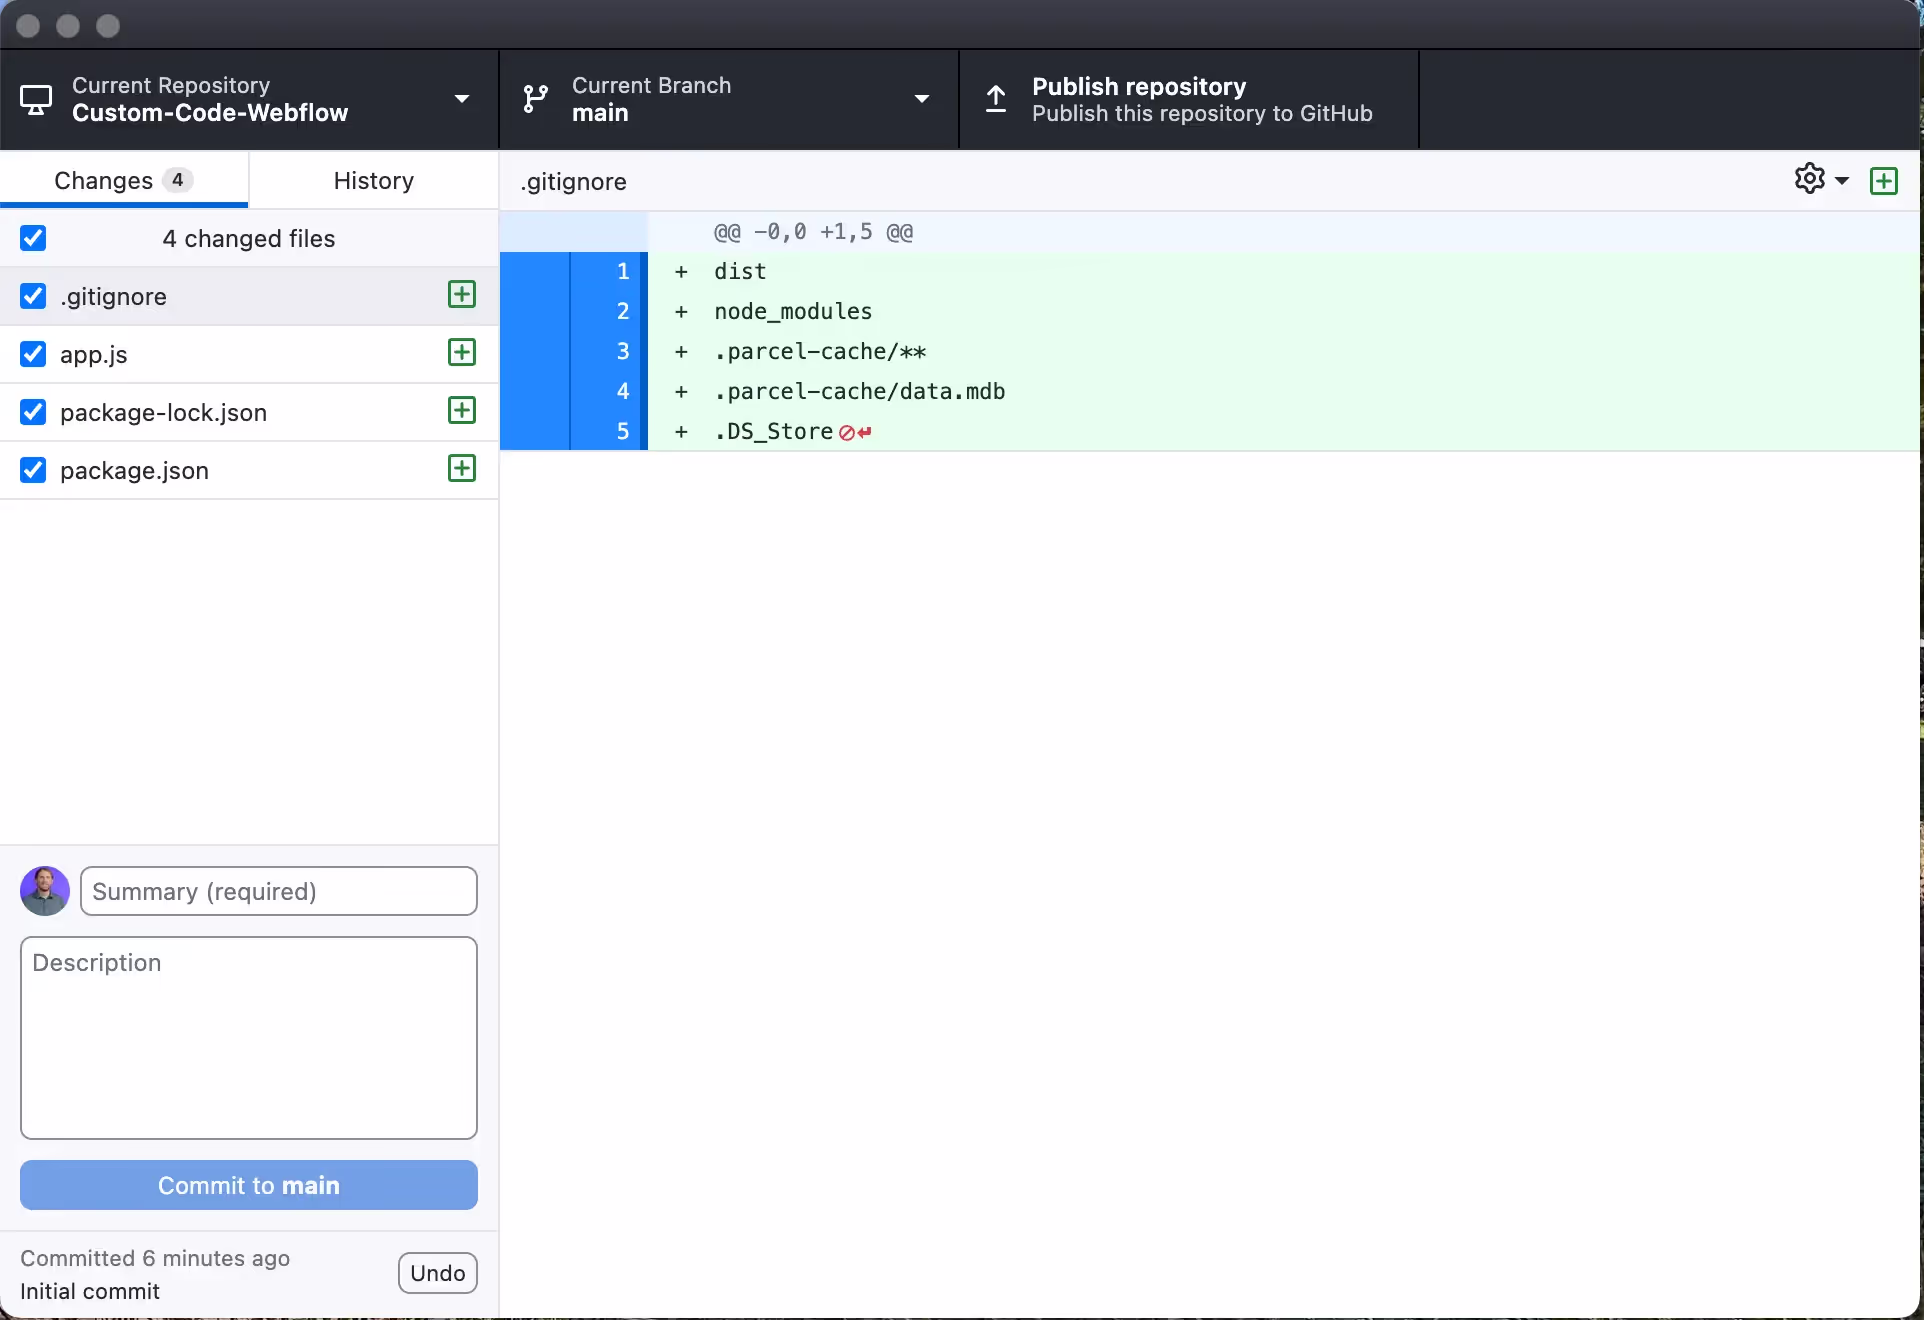
Step 5: Add a Git Ignore File
Create a .gitignore file and adding the following to it:
dist
node_modules
.parcel-cache/**
.parcel-cache/data.mdb
.DS_Store
The Git Ignore file will tell GitHub to ignore these files and folders. In other words, they won’t be uploaded to GitHub.
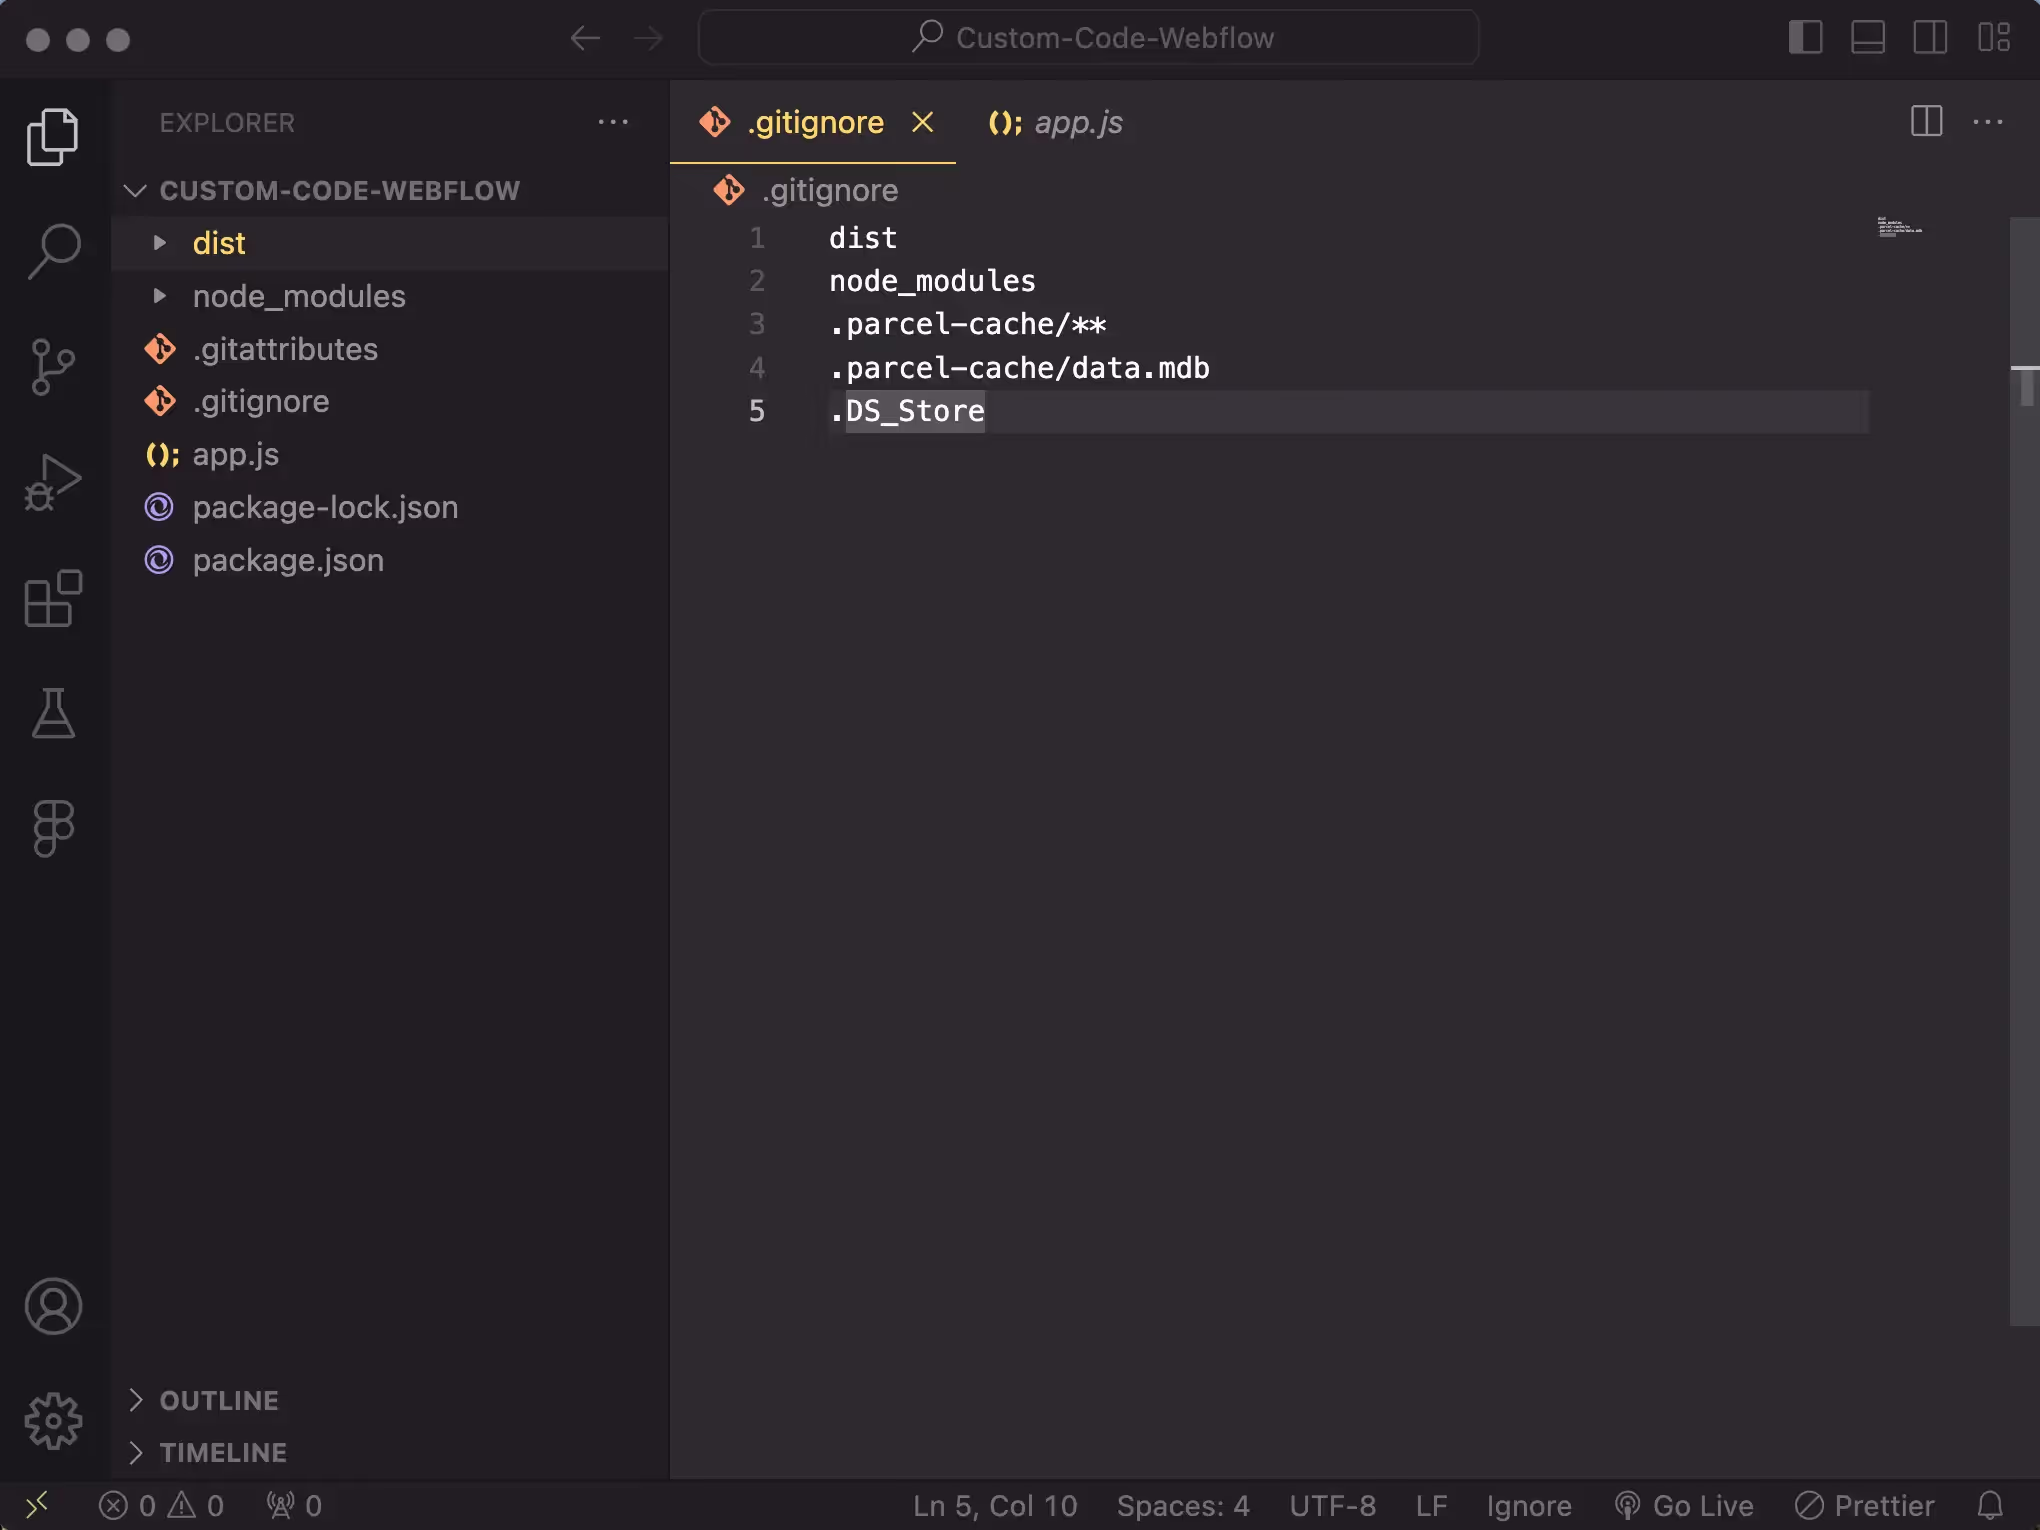
You will see that these files and folder disappear in GitHub Desktop from the left hand menu.
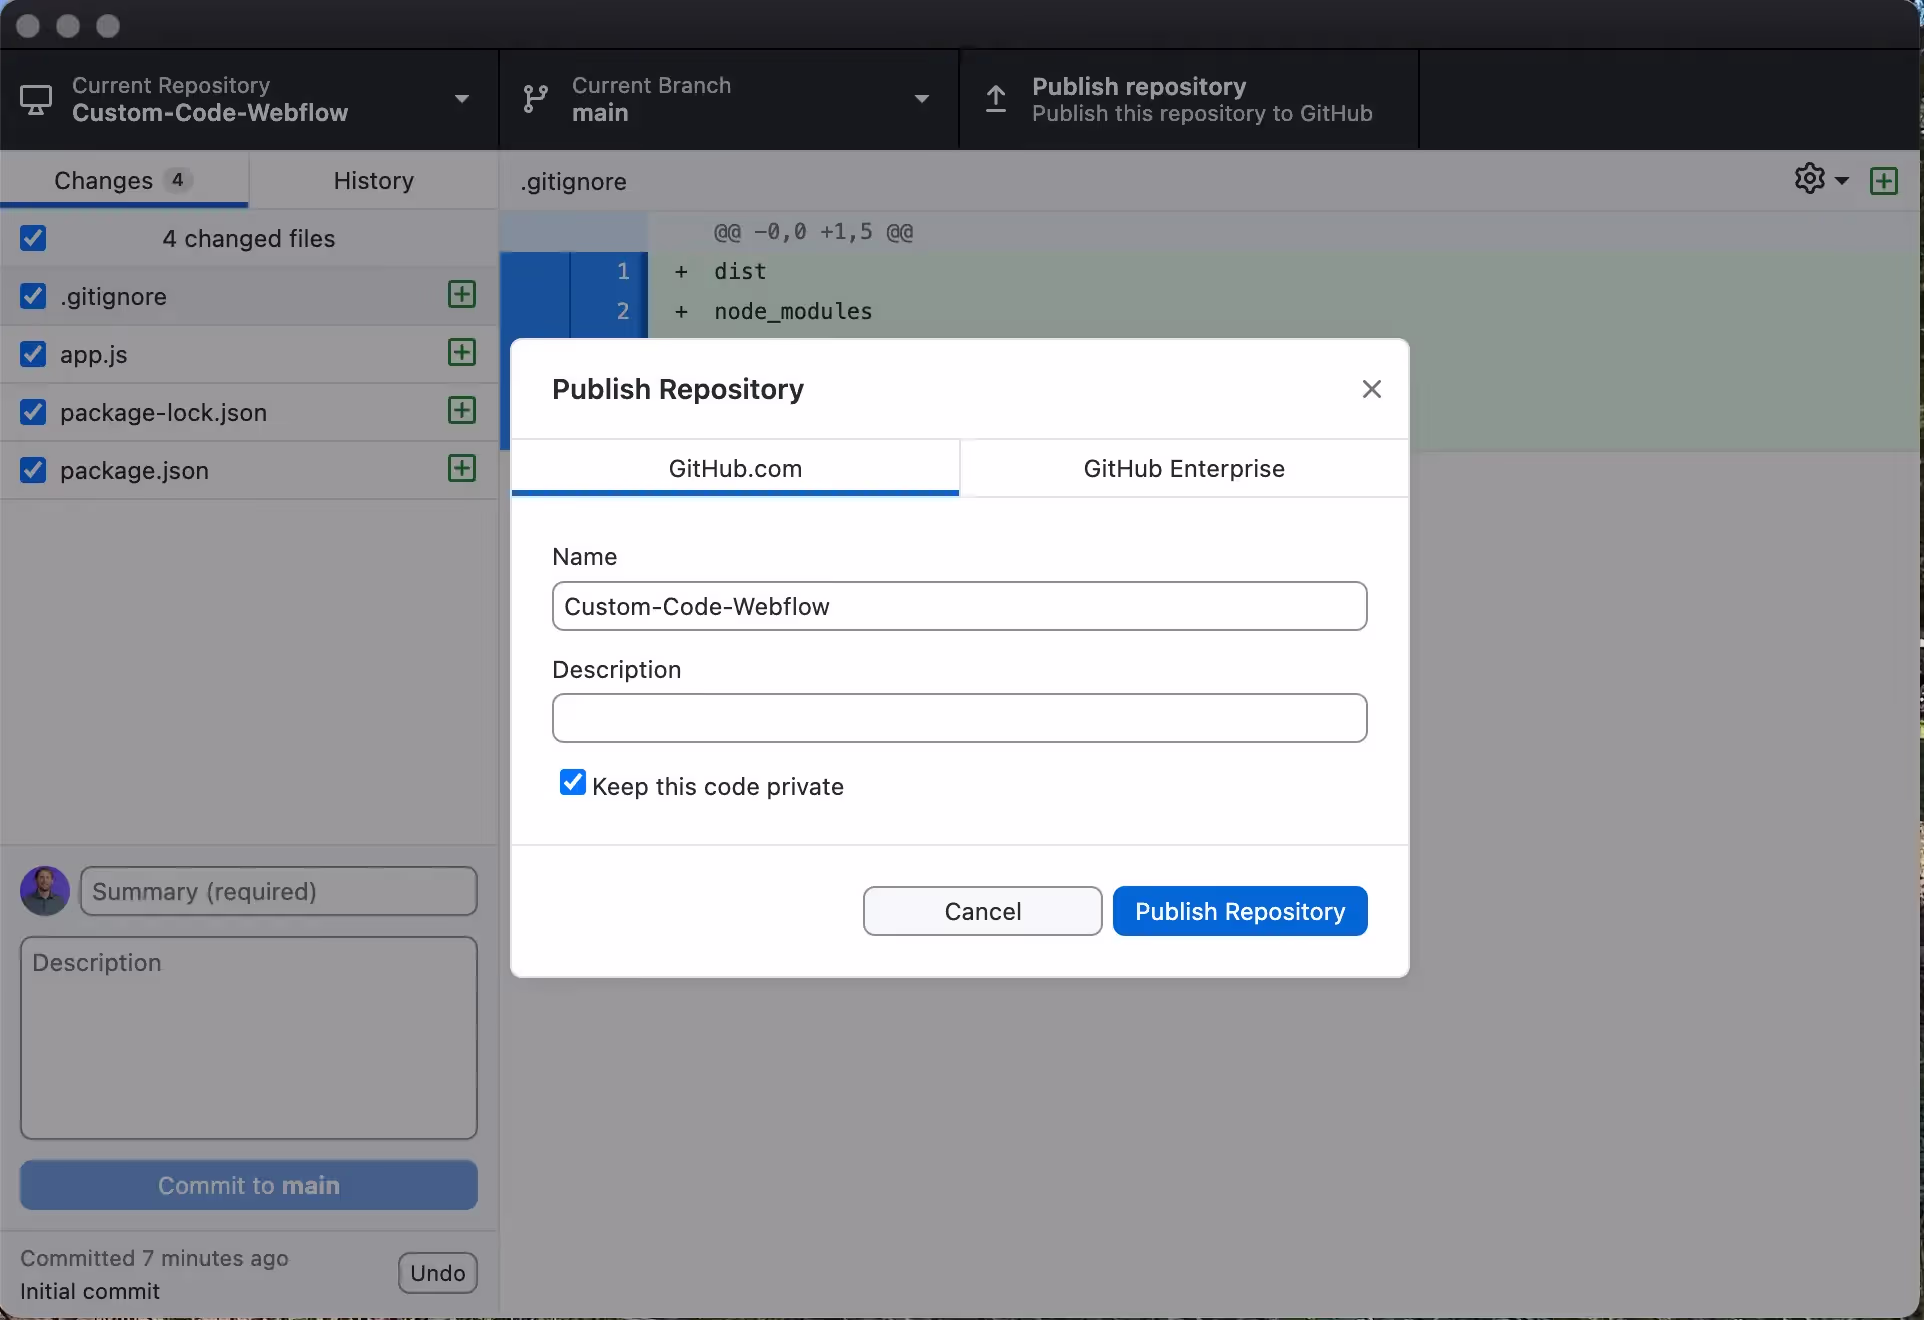
Step 5: Publish Repository to GitHub
Click Publish Repository. This will publish your repository to GitHub.
It will ask you for:
- The Name
- A Description
- Whether you want the code base to be kept private or not
Step 6: Make your first Commit
Once you publish your repository, you want to make a commit.
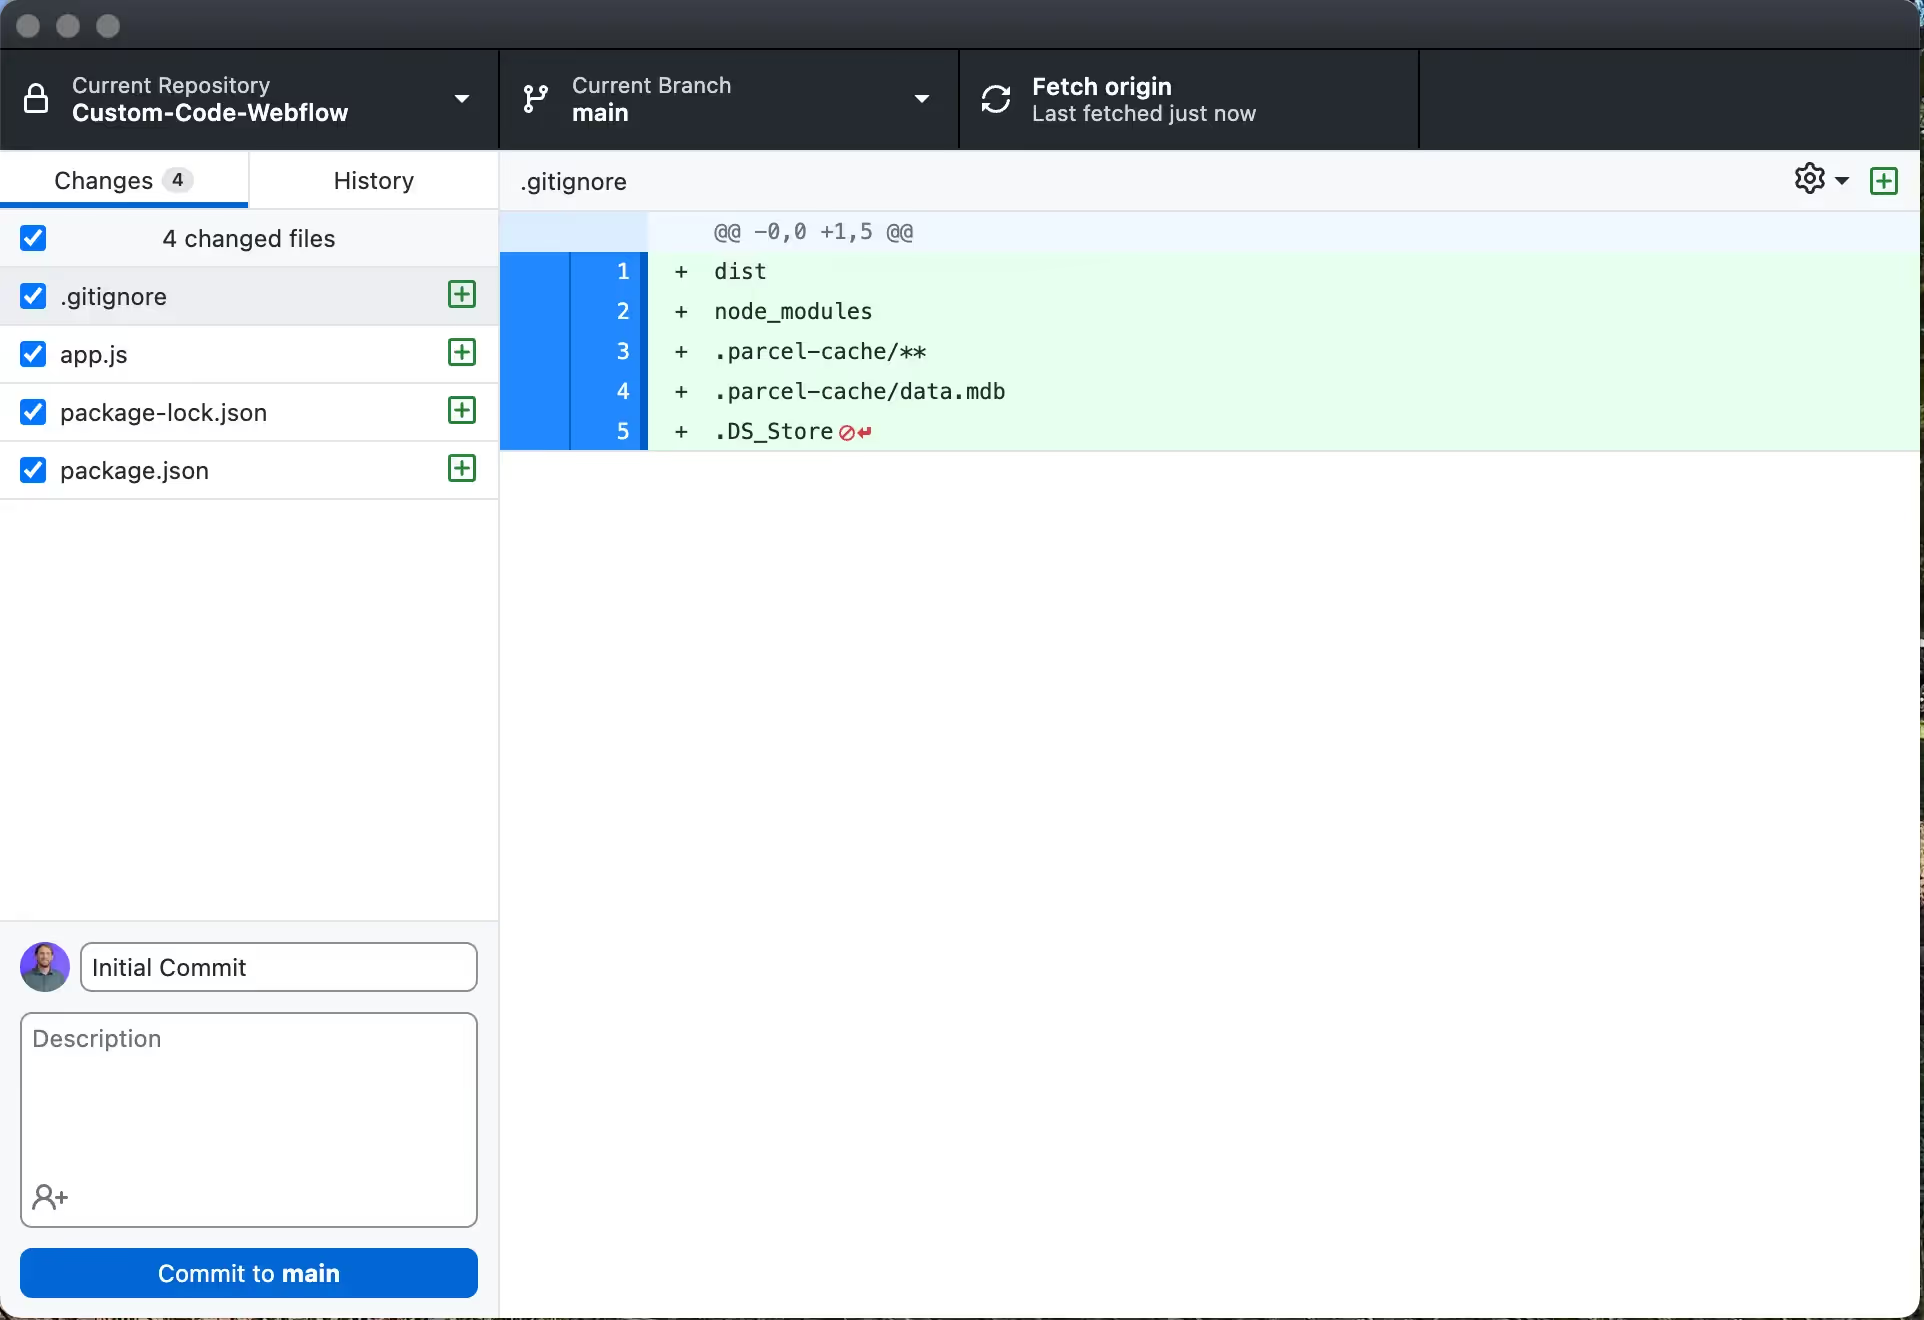
After you make your commit, you want to then Push to Origin
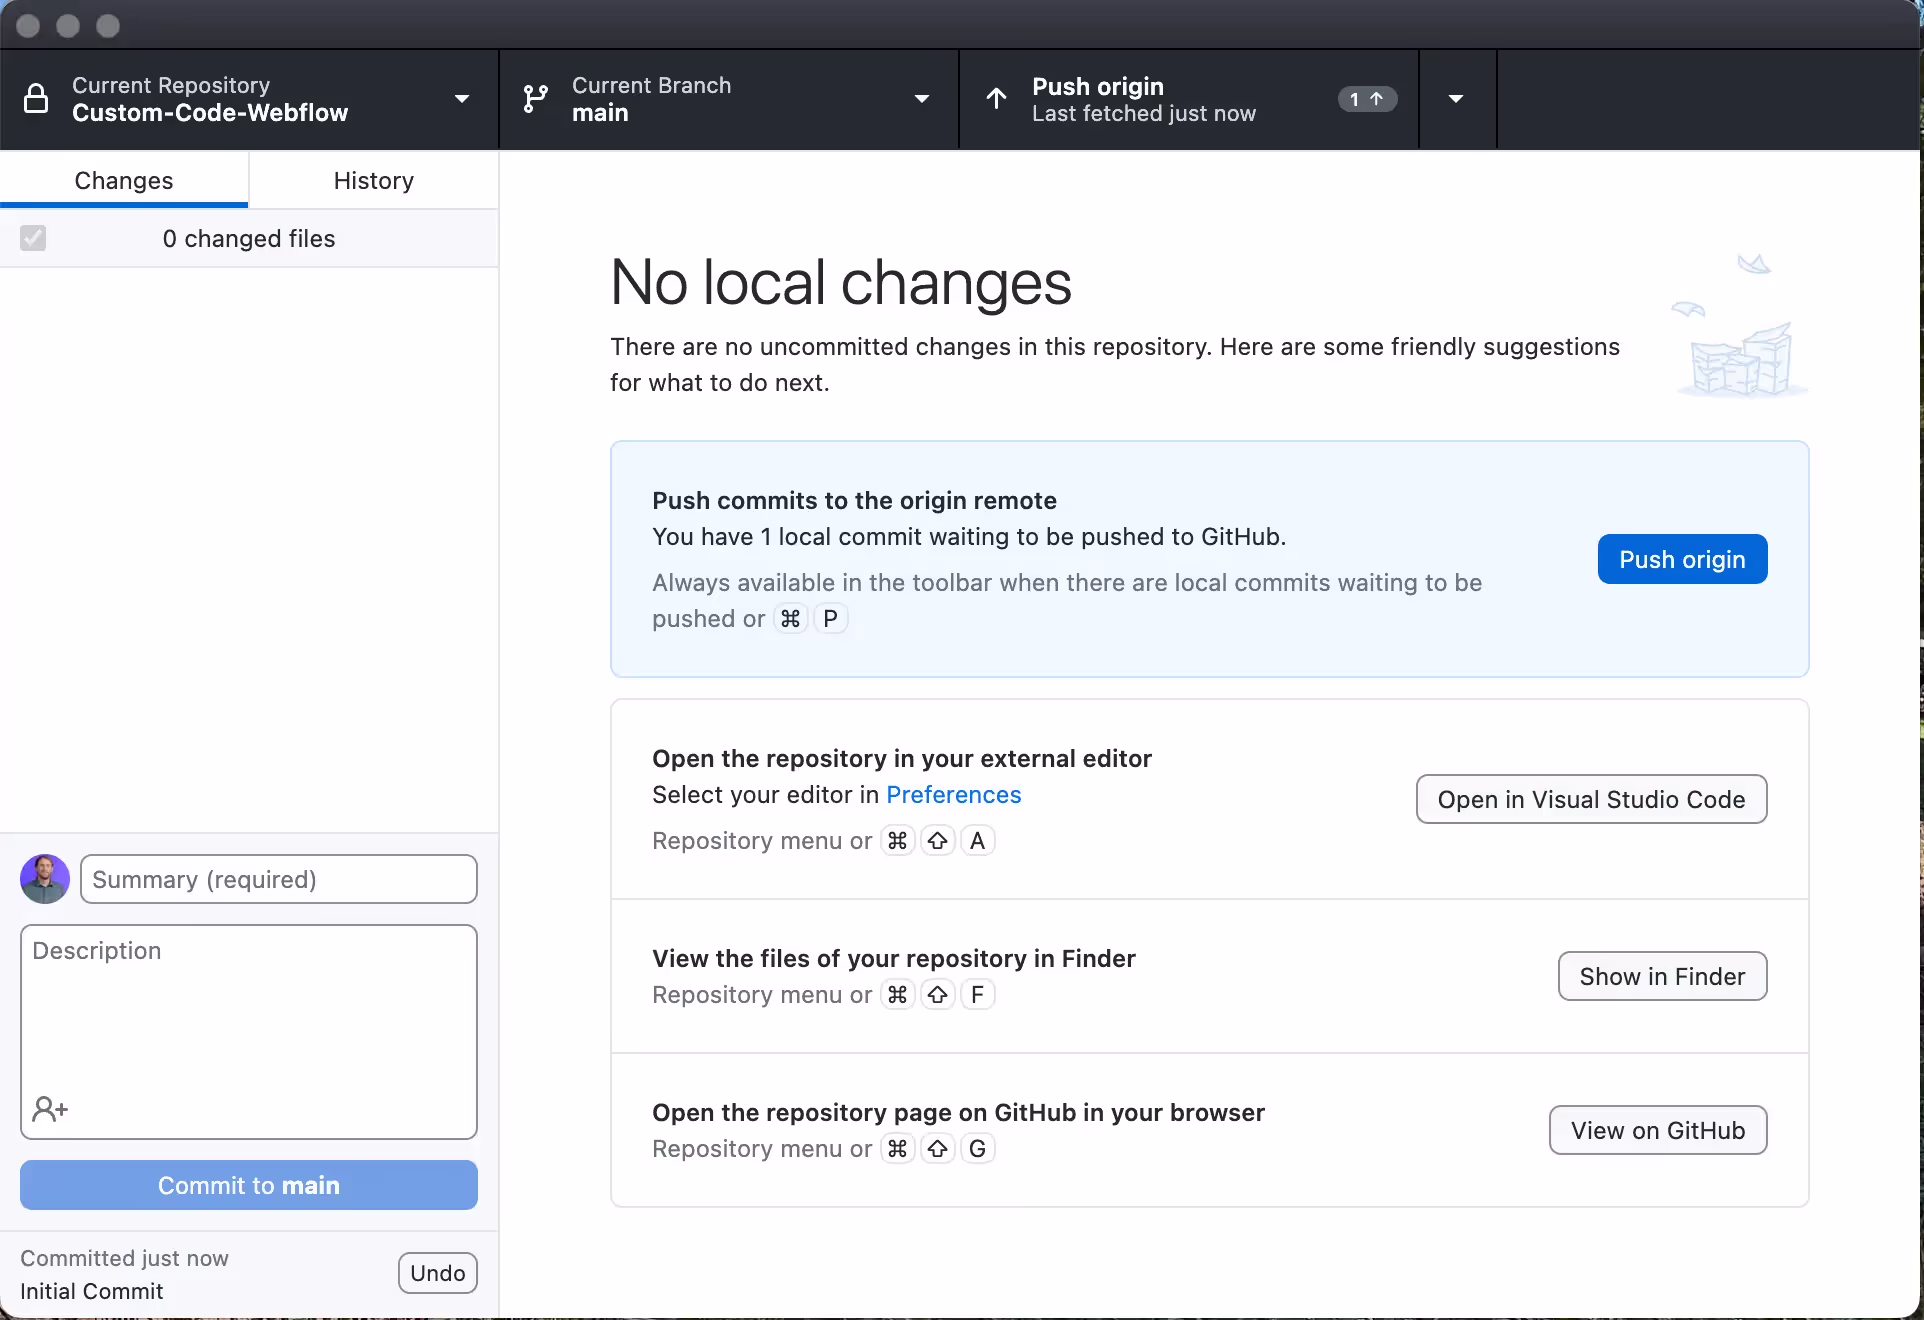
Once you Push to Origin, your files are in the repository on GitHub.
Step 7: Make changes to your file and push changes to GitHub.
Now GitHub will track any changes you make in your app.js file.
When you are finished making changes, or periodically during the development process, you can push the changes to your GitHub Repository.
In this instance, I deleted the console.log. GitHub recognized I deleted it. The deletion is highlighted in red.
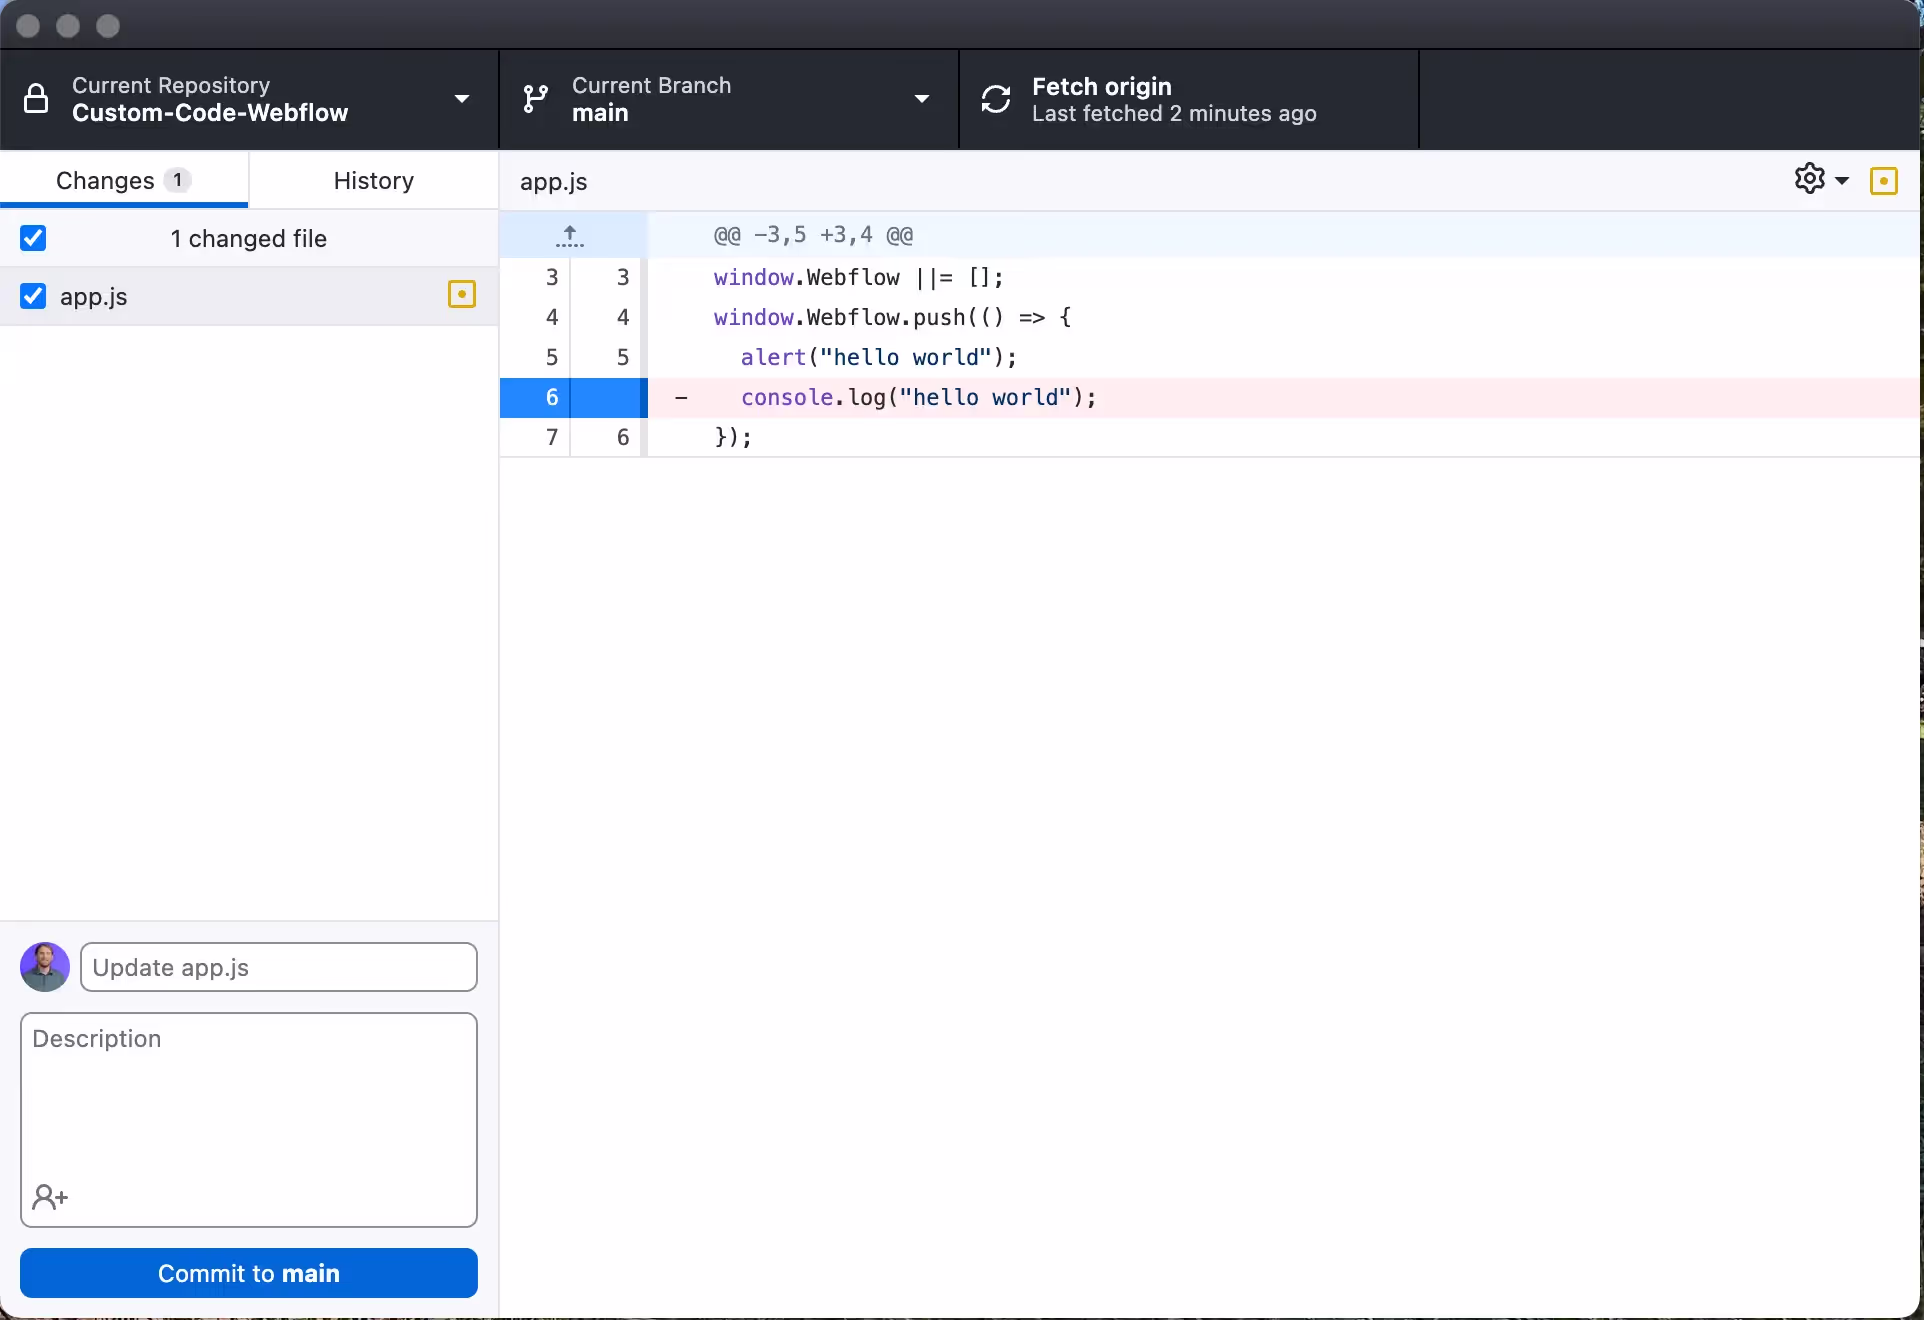
To add this change to GitHub, you would need to use the box on the bottom left to make a commit.
Then push the changes to GitHub on the next screen by clicking the blue button - Push Origin, just like in the image above.
Conclusion
Now, you can write your code in Visual Studio Code and simply refresh the page to see updates in Webflow.
As well as you can periodically push your code to GitHub to keep it safe and secure in the Cloud.
This method will significantly enhance your productivity and efficiency in custom Webflow development.
Enjoy your enhanced workflow!

End to End Webflow Design and Development Services
From Web Design and SEO Optimization to Photography and Brand Strategy, we offer a range of services to cover all your digital marketing needs.

Webflow Web Design
We design custom Webflow websites that are unique, SEO optimized, and designed to convert.
Webflow Support
Get dedicated design and development support from a Webflow Professional Partner without the overhead of a full-time hire or the hassle of one-off project quotes.


Claim Your Design Spot Today
We dedicate our full attention and expertise to a select few projects each month, ensuring personalized service and results.